Pìu the little bird

I'll tell this story here on the blog 'cause I'm amazed by the strenght of the nature.
Yeterday was a terrible day of rain and wind,and my boyfriend found this little bird near his garage. The baby bird was wet and fearful,and he took it at my home.
It was in a carton box,and was trying to open his little wings to fly away but immediately after he fell down.

I made a nest with and old basket filled of pile cuttings and putted it in the cage that used to be of my rabbit. The bird seemed to be happy of that change,and so I started caressing him and gave him a name: Pìu.

Every 1/2 hour i feeded Pìu with the tip of a chopstick dipped in baby food (homogenized meat), and gave it some water with a dropper.
He passed the night here at home,quiet and sleepy.

Today in the early morning he started cheep loud, and after a few minutes I heard a sort of answer out of the window. Didn't know what to do,but I followed my instinct. So I putted the cage out of the window and...my god...the mom arrived with a little worm for him! I was astonished and so happy!

She feeded the baby for a little bit, then convinced him to follow her. And so the little Pìu is gone,and today I'm happy and I thank god 'cause I saved a life and I'll always have a friend over there =)
Dedicated to all the moms and to their strenght also in troubles; and to that ones who feel already lost like the little bird.


The Body Frappe!


A new product for my shop!! The WHIPPED BODY FRAPPE!!


This is a new whipped body frosting with an unique texture and divine scents. Absorbs quickly into the skin and makes you smell soooo sweet <3


I've made it in 3 scents so far: FLUFFY CHERRY,JUICY PEACH,AND LEMON SPLASH.


The cherry one is DIVINE, smell it is like smell a basket full of real red juicy cherries.


You can see above the packaging I've made (also the labels are handmade with a special adhesive paper for printers ^^).


What do you think about this new add? Do you like the scents?


Any advice or critique is greatly apreciated!


Soy candles or Lip balms?

Hi people!! How are you?? Just finished to make my new soap!!! I'm very satisfied on my work,the soap looks good and smells soooo fresh.
I used a clear soap base and a FRESHLY CUT GRASS divine fragrance oil;then I casted into the soap some leaves of rosmary and laurel. Smell this soap is like take a walk in the park at sunday morning. Great work Bella ^___^

Now I have to talk about something else. I'm thinking about adding some new prodcts to my shop,but I already can't decide!!
I'd really like to try something new like soay candles/tarts; I'd like t make some soay candles in apothecary jars like this:

They are so colorful and cute that I spend hours looking at them in shops and on the internet =)

The other thing I'd like to start making are lip balms; I tought something like little jars or tins,with colorful labels!

What do you think? Can you dear readers help me with my decision???
Thank's for your help, have a nice day,
Bella <3

TREASURY (my first one)


Hi people! This afternoon I got my very first Etsy treasury and was soooo excited setting it up =) I've featured some of my favorite items and sellers. The theme was spring/nature/50's


You can take a look at the room here: http://www.etsy.com/treasury_list.php?room_id=49889


And because it will expire in 2 days,I'll post here also the screenshot (click to enlarge):


I'll apreciate any click/wiew/comment!!! Hugs,and have a nice day
BELLA <3

How to: make BATH BOMBS

Everybody loves BATH BOMBS!!! They are so colorful and funny to make a simple bath become an amazing experience of relax,fun and aromatherapy!
You can find them in the stores in many colors,scents shapes...but what about creating them at home,with your favourite scents and colors??? Maybe adding some glitters or dryed flowers??

(I'm sure you're running to get the apron! )

Now I'll teach you a simple way to do them,the same recipe that I do for mines. =) Don't worry,it's easy and you don't need strange or dangerous ingredients

You'll need:

- a large bowl for the dry ingredients

- a small bowl for the wet ingredients

- a spray bottle for the water

- spheric moulds (for the classic round bath bombs,but you can use every other kind of mould)

Ingredients:

Baking Soda - 8 ounces
Citric Acid - 4 ounces
Corn Starch - 4 ounces

Water (put it in the spray bottle)

Essential or Fragrance Oil
Oil (olive oil or sweet almond oil will work - I use sweet almond)

Food coloring - 1 or 2 drops.

Instructions:

Mix in the large bowl all the dry ingredients. Mix very well.

Mix in the small bowl all the wet ingredients (except the water that must be poured into the spray bottle).

Now mix carefully but as fast as you can the wet ingredients into the dry ingredient's bowl. If you see that the powder starts fizzing, mix fast and this will stop the reaction.

Now you should have a soft colored and scented powder, not too dry and not too wet.

Spray water 3 or 4 times and mix mix mix very fast to avoid it fizzing.

Now you should have reached this consistence


Press the mixture in the moulds; if you're using the spheric moulds (that can be found as christmas decorations in many stores) press well the mixture in each half mould and then press well the 2 half moulds together.

If you want to add something on the top of the bomb (glitters,dry flowers,herbs,sprinkles..) put it in the bottom of the half mould before filling it with the mixture.


You don't need to leave them in the mold for very long, and in fact can tap them out as soon as you fill them.
Leave them drying for some hours.

Jump in the tub and Enjoy!!!

Here are some exemples and inspirations for your bombs:


Tutorial by Bella, pics are taken from google (if anyone has problems please convo me and I'll delete them. Thanks for the collaboration. <3 )

INSANE PROMOTION!

HTTP://BELLABUBBLESSHOP.ETSY.COM

3 DAYS OF INSANE PROMOTION!!!!!!!!!!

ANYONE WILL BUY A SOAP WILL HAVE ANOTHER SOAP FOR FREE! <3

Expires on sunday night 12.00 pm (Rome time - GMT+1)
2X1 2X1 2X1 2X1 2X1 2X1 2X1 2X1 2X1 2X1 2X1

Princess soap pics!!!

As I promised yesterday, here I am to post the pics of my Princess soap =) It's a rainy day so the light is not amazing, I tryed to add some light with photoshop.
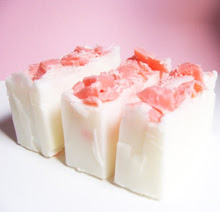
The soap isn't cutted in bars already.


Princess soap <3


Hi people! Today I've produced a new soap!!! Hurray =)


In the last weeks I had to study hard for an university exam and wasn't able to make soap ='(


The gorgeous soap I've made is white as snow, creamy and rich in oils and vitamines, and is decorated with cute hot pink flakes of soap on top.


The scent is simply divine, because of the essential oils I've added: geranium,lavender and rose!

Is amazing, I'm sure that all the princesses would like to have it when they jump in their tub!


I'm thinking about selling it alone and in a shaving set with a pink lady razor!

I'll upload the pics tomorrow, hope you're going to like it!!
Good night,
Bella <3


How to make you own lip balm


There are many kinds of lip balms you can find for sale in the shops,but no one will ever be like the one you make YOURSELF at home with the natural ingredients you like and you know you need =)

I've collected many recipes and do my lip balms at home every time I need them!
Here I'll try to explane this easy technique and the ingredients you'll have to buy.

FLAVOURED MOSTURIZING LIP BALM
Ingredients:
- Beeswax 1/3
- Honey 1/3 (super mosturizing and glossy)
- Shea butter 1/3 (the best for skin and lip problems)
- 3 drops of your favourite edibles flavour or essential oil (you can try Sweet orange essential oil 3 drops + 3 drops of vanilla extract, yes, the one you use for cakes ^^).
Melt beeswax and shea butter together in a little pot on the cooker. Stop the fire and add the honey. Mix,mix,mix...now add the drops of the essential oil/flavoured oil you want.
Put all in a little jar and let it become cold. You'll see in a few minutes it will start to harden.
Wait something like 24 hours and you'll have your super costumized lip balm!!
You don't need to add preservatives because honey,beeswax and shea butters are not attackable for bacteria.
If you want a light preservative wich is also an excellent mosturizing agent use VITAMIN E in drops!!! Nothing's better for your skin! <3
Enjoy and let me know what you think about the tutorial! I'm waiting for your comments and recipes =)

New soap bars!!

New massage bars! Made with lavender best quality essential oil with calming and shooting properties. The mosturizing and creamy agents are olive and sweet almond oils. The olive oil is an extra-virgin, local producted here in Riviera <3


This is my new raspberry soap!! Mde with the podwer of true raspberries,so the little seeds can contribute to scrub gently your skin =) The soap is enriched with sweet almond oil and extra-virgin riviera olive oil --> mosturizing agents!


If you're interested you can find this soap for sale on my etsy shop http://bellabubblesshop.etsy.com
Have a nice week,
Bella <3

Valentine's day last minue

Are you ready with Valentine's presents?? No?? Don't worry =)


Still don't have idea of what to buy for Valentine's day for your girl-friend/special ones ??

This gift certificate is available at our Etsy shop and is an amazing "last-minute" solution!
Certificate with code will be sent to you through e-mail or convo (your choice) in 2 sizes:- High quality jpeg file, Printable size- E-mail sizeYou can print it on a cardstock and give it to your sweetheart in a cute envelope with a box of chocolates or send it through e-mail if you're far from each other <3<3<3>

Lavender essential oil


Hi!! Back to the blog after a lot of time.

This days we're renewing the home's furniture and there's a lot of work to do,so I have had no time to write.
Btw today I'd like to talk about the amazing properties of Lavender (Lavandula angustifolia)! This post is dedicated to all the Bath and Beauty producers and to everybody likes to know something interesting about this faboulous plant.


Lavender essential oil has soothing, calming, and restorative properties. The essential oil is antiseptic, cooling and mild. Considered the universal oil, lavender is readily used neat, or undiluted, and combines well with almost all other oils for a wide variety of benefits. Many aromatherapists say lavender is the first essential oil to get.
Lavender Essential Oil Physical Benefits and Effects:
Skin care – especially dry or acne prone skin
Headaches – rub a drop or two on the temples for tension migraine relief.
Burns – The cooling, soothing and skin restorative effects are good for anti-inflammatory sunburn care. Documented use as an emergency care for heatstroke until medical personnel can arrive.
Insect Repellent/Bites and Stings – Repel bugs and takes the sting away from bites.
Blood Pressure and Heart – Soothes heart palpitations and lowers blood pressure because of anti-stress properties
Congestion/Asthma – Anti-spasmodic and anti-inflammatory effects make lavender good for respiratory support. Suitable for use with children as well.
Dandruff – Stimulating and moisturizing effects help with hair shine and dry scalp.
Lavender Mental/Psyche Effects:
Anti-Stress – Calming and soothing effects help counteract stress hormones
Antidepressant – Lavender is a well-documented antidepressant essential oil.
Refreshing and Uplifting – Can help balance mood swings and PMS symptoms
Insomnia – A mild sedative effect for restless or anxious nights
**A word of caution. Those with sensitive skin cannot always tolerate direct application of lavender oil to the skin. If that is the case for you, you can dilute the oil with a carrier oil such as almond oil or jojoba oil. European made essential oils are the best for now unless you know the source that you are getting the oil from is organically grown. Europe has standards for the production of essential oils, the United States does not. Because of the extreme concentration of essential oils, they should always be organically grown. As always, be wise and use your own best judgement!


Thank's to:

How To: Felted soap

Hi!!

Today I'll feature a super kind seller but I won't feature her by showing her items, but showing her Felted soap tutorial!

The name of the author is Beckyrose and you can find her blog here http://beckyrosedesigns.blogspot.com/

You can also visit her Etsy shop here http://beckyrose.etsy.com

How to: Felted Soap


Felted soaps have been one of my best selling items, probably due to a combination of several facts- they're fun, extremely functional, make great gift, unusual, and less expensive than anything else in my store.

For a while I've been planning on putting together a tutorial on how to make them so that you can all give it a try! I will try to explain everything in a way that someone who has never felted before can understand. Also, if there is anything you don't understand please ask me questions and I would be happy to add that information in.

First off for those of you who are thinking "ok, that's nice, but what on earth is felted soap??" here's the basic description that I include in my etsy listings-
"Felted soap functions as a built in washcloth and gently exfoliates while creating a lovley lather. Just wet, rub a little to get sudzy and use! As the soap is used up the felt casing will shrink with it until it gets very small allowing you to use every last bit as well extending the life of your soap. Once the soap is gone you will be left with a small, great smelling, felt pouch that can be cut open and used to put something special in, or kept as a shower scrubby to use with the other fabulous handmade soaps from etsy."

The basic idea behind wet felting is that agitation, hot water, and soap cause the wool fibers to tangle more and more tightly together and eventually become a solid piece of felt. Felted soap is a great introduction to wet felting because the soap is already part of it, and it is a small project so it goes relatively quickly and you can get the feel for felting before going on to bigger projects.

I would recommend starting out making only one at a time, until you get the hang of it. I usually do 3 or 4 in a sitting but then my hands get so soaplogged (you know how your fingers get all shriveled up and waterlogged when you've been swimming for too long? it's like that but you have soap in your fingers) that I can't stand it any more and need to take a break. The funny part about that is the next time you go to wash your hands they're already soapy.

Let's get started!


You will need:
-a towel
-wool (I use merino because it is the softest and also wet felts more quickly than other types)
-a bar of soap
-hot water (in a bowl, or a squirt bottle)
-(optional) a piece of rubber or plastic mat


Lay the plastic mat on top of the towel (if you don't have a rubber mat
I would reccommend doing this on a plastic table top or some
other surface that won't be damaged by water.


Step 1: (skip if you only have one color of wool)
lay out little wispy bits of wool in the pattern and color that you want, if you would like a really specific design lightly needle felt it together first but only enough that it stays put. I like to play with color in more abstract designs and see what happens.


Step 2:
Begin drafting out THIN strips of wool vertically (I usually use all one color at this point, but you can certainly keep using as many colors as you want) make an even layer in a square about 4 or 5 inches on each side for a normal bar of soap, if it's smaller or larger compensate for that size difference by making the area that you are laying wool out a bit bigger or smaller.

Step 3-5:

Lay out wool in the same manner going horizontally, then diagonally one way and then diagonally the other way. Pat it, it should have an even thickness and not show through to the mat/table in any places, it should be a bit poofy, but not super thick. Then put an extra horizontal piece and vertical piece in the center. The reason for going all different directions is it gives the wool more places to tangle, the barbs on the individual strands of wool all go the same direction so if you lay them against each other facing opposite ways they will snag on eachother more readily.


Step 6:
Ok, now plop your soap diagonally in the middle.


And start to fold in the corners one at a time


Wrap it up like a nice little present.


If there is a color that you like that's being covered up, just pull it out from underneath and lay it lightly over the top wherever you want it.


Now flip your nice little package over so that the weight of the soap holds the folded pieces in place. Check to make sure there are no thin spots where the soap shows through, if there are, unwrap it and fill in those places with more wool.

Now you're ready to start felting!


Step 7 (I think, yeah, we'll just call it 7):
Get your bowl of HOT water. Not so hot that you burn yourself,
but close.


Drip water onto the top of the soap, if you have a squirt bottle you can just squirt a little out.


Pat gently.


Using your other hand to cup the side, drip water on each side, patting gently afterward.


What you are trying to do right now is to get all of the
wool just a little bit wet.


Once you have wet the top and sides flip the soap over, the water should have pooled enough to wet the underside. Pat gently. If there is a lot of water pooled around the soap, dump some back into the bowl.


Continue to work your way around the bar patting all sides DO NOT RUB! Rubbing at this point could cause bits to stick up and become "dread locks" or pull the wool away from parts causing holes where the soap sticks out.


Keep patting... spend at least 10 minutes patting your first time, eventually you will learn to recognize when you're ready for the next step and it may take less time. This step is the felting part, you are making all the different layers of wool stick together.


After a while it will change, you'll know what I mean, see how different the texture looks in the picture? It will also have shrunk a bit around the soap so that it is more fitted to the shape of the bar.


Step 8: Fulling, I couldn't get any good pictures of this because I was using both hands and they were covered in soap suds so hopefully I can explain well enough.
Fulling is the final step to felting where you agitate the wool and it shrinks and becomes more solid. Before this step you can still pull off the fiber without too much trouble if you wanted to, after it you would need scissors or a lot of patience to rip it open.

I usually do this part near a sink because it can get kind of messy and you have the hot and cold right there. Otherwise, get a bowl/bottle of really hot water and one of cold water. The temperature change helps make the fulling process go faster because it opens and closes the scales of the wool. Also, rinsing in cold water at the end helps get the suds out of the wool casing.

Begin by wetting with hot water and rub very gently someone once told me to rub it like it was a baby bunny, I think that's a good motivation for just how gently you should rub at first if you rub hard you could still pull it apart or create dreads. Use a circular motion and try to rub equally on all sides. As it gets soapy rinse it off in alternating hot and cold water, you should feel it start to tighten up after a few minutes, as it does you can rub harder, rotating it around in your hands. If you have a washboard or something textured you can rub it against that for extra agitation.

When you think it's done, keep going, just a bit longer.


Final rinse in cold water, squeeze dry in a towel and place in a well drained place to dry, I use a dish drying rack.


TA DA! Felted soap!

Have fun and we'd love to see pictures of what you make :)

My items for sale on Etsy